''a posteriori'' sonification: Difference between revisions
David Sousa (talk | contribs) |
David Sousa (talk | contribs) mNo edit summary |
||
| (5 intermediate revisions by the same user not shown) | |||
| Line 5: | Line 5: | ||
== TwoTone == | == TwoTone == | ||
There are many ''a posteriori'' sonification applications that you can find online. [https://twotone. | There are many ''a posteriori'' sonification applications that you can find online. [https://twotone-midiout-beta.netlify.app/ TwoTone] is a software program by Google that allows you to generate sounds from data. This software has its own database, and it is updated regularly. This shows how popular sonification is. | ||
TwoTone is a flexible software that allows one to add multiple data tracks from a data source and map the data to a chosen scale, choosing the instrument, the octave, range, starting octave, tempo, etc. The user can also add soundtracks from the database, upload its soundtracks, and record sound from the microphone. | TwoTone is a flexible software that allows one to add multiple data tracks from a data source and map the data to a chosen scale, choosing the instrument, the octave, range, starting octave, tempo, etc. The user can also add soundtracks from the database, upload its soundtracks, and record sound from the microphone. | ||
| Line 46: | Line 46: | ||
== Collect and store data with micro:bit == | == Collect and store data with micro:bit == | ||
There are many different ways to collect and store data. Using a microcontroller can be very helpful if you are designing your own data collection device, and the micro:bit is a great choice, as it is flexible and easy to use. If you are not yet familiar with the micro:bit microcontroller, we recommend you to start by reading the [https://wiki.soundscapes.nuclio.org/wiki/Real-time_sonification | There are many different ways to collect and store data. Using a microcontroller can be very helpful if you are designing your own data collection device, and the micro:bit is a great choice, as it is flexible and easy to use. If you are not yet familiar with the micro:bit microcontroller, we recommend you to start by reading the [https://wiki.soundscapes.nuclio.org/wiki/Real-time_sonification real-time sonification] SoundScapes wiki page where we introduce the readers to quick tutorials and examples. | ||
To store data on the micro:bit you need first to install the Makecode extension [https://makecode.microbit.org/reference/datalogger datalogger]: | To store data on the micro:bit you need first to install the Makecode extension [https://makecode.microbit.org/reference/datalogger datalogger]: | ||
| Line 73: | Line 73: | ||
If instead of using a micro:bit sensor you want to collect data from an external digital/analog sensor on a micro pin or using for instance the I2C protocol (all of these blocks can be found under the advanced categories) you can use the same program but simply replace the '''acceleration''' input block with the corresponding block as follows | If instead of using a micro:bit sensor you want to collect data from an external digital/analog sensor on a micro pin or using for instance the I2C protocol (all of these blocks can be found under the advanced categories) you can use the same program but simply replace the '''acceleration''' input block with the corresponding block as follows: | ||
| Line 79: | Line 79: | ||
[[File:Soundscapes | [[File:Soundscapes analogreadpin4.png|350 px|center|Analog read pin]] | ||
[[File:Soundscapes i2c.png|700 px|center| | [[File:Soundscapes i2c.png|700 px|center|i2c pin]] | ||
'''Attention to the pin number or the i2c address!''' | '''Attention to the pin number or the i2c address!''' | ||
=== a posterior sonification with micro:bit === | |||
If you are not yet familiar with the SoundScapes sonification extension for Makecode micro:bit we recommend you to visit the [https://wiki.soundscapes.nuclio.org/wiki/Real-time_sonification#The_SoundScapes_sonification_extension_for_micro:bit wiki section dedicated to it]. | |||
When you collect data with the micro:bit for playing a posteriori you can save it an array. The following example collects '''light-level''' data for 10 seconds (one value per second) while mapping it to the Middle D Minor scale on 2 octaves, and plays the data after collection, each tone sequentially for 1000 ms: | |||
<HTML><div style="position:relative;height:0;padding-bottom:60%;overflow:hidden;"><iframe style="position:absolute;top:0;left:0;width:100%;height:100%;" src="https://makecode.microbit.org/#pub:S14572-08936-66698-49202" frameborder="0" sandbox="allow-popups allow-forms allow-scripts allow-same-origin"></iframe></div></html> | |||
The map function for arrays returns an array of integer numbers from mapping an input array to a specified music scale and number of octaves. Any array of numbers can be used as input. This is useful for a posteriori sonification when you want to sonify the data after collecting it. | |||
Latest revision as of 16:07, 7 December 2024
The great majority of sonification examples available on the web are audio files that represent a sequence of several data layers of a certain phenomena (physical, astronomical but also metadata, web statistics, economics, health parameters) during a certain period of time. These are stored data converted to an audio file.
We call a posteriori when the data is sonified after being collected and stored. a posteriori comes from Latin and means "from the latter" or "from the one behind". It is usually used in philosophy to refer to a statement that comes after experience. While in real-time sonification we do not know what exactly will be the next data input, in a posteriori sonification, when we store a sequence of data we can take our time to analyze it and adjust our output sounds and test them. The data set is translated into a sound piece as a whole.
TwoTone
There are many a posteriori sonification applications that you can find online. TwoTone is a software program by Google that allows you to generate sounds from data. This software has its own database, and it is updated regularly. This shows how popular sonification is.
TwoTone is a flexible software that allows one to add multiple data tracks from a data source and map the data to a chosen scale, choosing the instrument, the octave, range, starting octave, tempo, etc. The user can also add soundtracks from the database, upload its soundtracks, and record sound from the microphone.
Using TwoTone
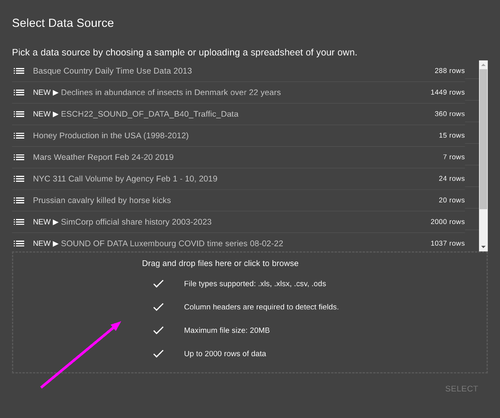
To start playing with it, TwoTone comes with a database that the user can explore to test the software features. After you feel comfortable with it, you can import your own data.
Prepare and import data
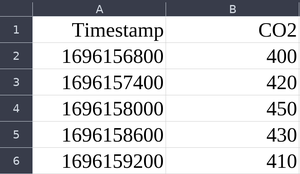
After collecting and storing the data you want to sonify (either with a device like a microcontroller, a computer, a smartphone, from a web source, or by hand) you have to prepare the data in the right format. For instance, imagine you have collected air pollution data from an air quality station:
- Open Excel (or another equivalent spreadsheet software) and write the first row as headers. Use simple headers like "Timestamp" and "CO2". This row will be treated as the names of the data fields.
- The rows below the headers should contain the actual data.
- Save your file in .csv format.
In this example, the data file should look like the following:
When selecting a data source, upload your file in the rectangular box, either by clicking it and browsing your local folders or by dragging the file into it:
Data from the Web
There are many certified/credited sources of data online that you can use in your sonification projects. Here is a list of suggestions:
- Our World in Data - comprehensive online resource that provides accessible data and research on global development, covering topics such as health, education, and the environment.
- Pordata - a Portuguese online database that offers statistical information on various aspects of Portugal's society, economy, and demographics, facilitating access to data for research and analysis.
- Datos Clima- Spanish platform that provides access to climate data and information, focusing on the impacts of climate change and promoting awareness and research on environmental issues.
Collect and store data with micro:bit
There are many different ways to collect and store data. Using a microcontroller can be very helpful if you are designing your own data collection device, and the micro:bit is a great choice, as it is flexible and easy to use. If you are not yet familiar with the micro:bit microcontroller, we recommend you to start by reading the real-time sonification SoundScapes wiki page where we introduce the readers to quick tutorials and examples.
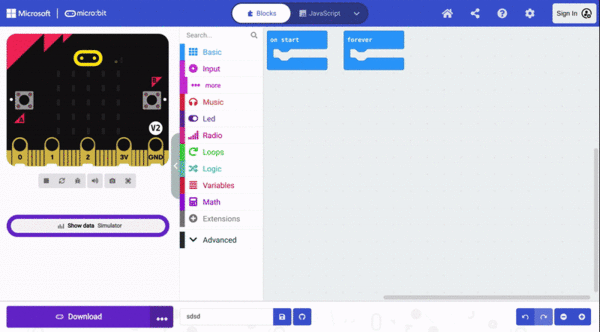
To store data on the micro:bit you need first to install the Makecode extension datalogger:
Using internal sensors
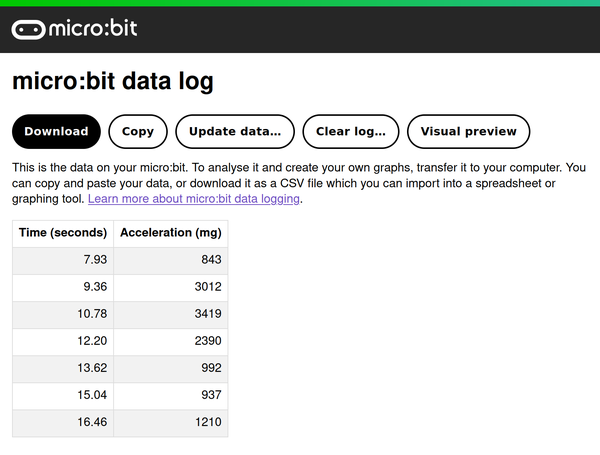
The following is an example of how you can program the micro:bit to collect and log data on the board. The example logs the acceleration strength input, but another internal sensor (sound level, light level, compass heading, temperature) or external sensor can be used.
To access the data, open the micro:bit in you file explorer/manager and open the file MY_DATA.HTM. Notice you can also copy it, save it in .csv format (ready to import to TwoTone), or visualize it.
Using external sensors
If instead of using a micro:bit sensor you want to collect data from an external digital/analog sensor on a micro pin or using for instance the I2C protocol (all of these blocks can be found under the advanced categories) you can use the same program but simply replace the acceleration input block with the corresponding block as follows:
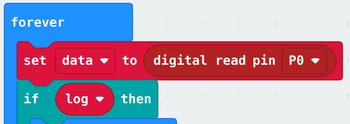
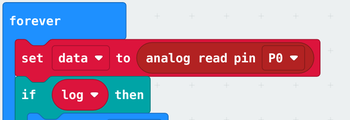

Attention to the pin number or the i2c address!
a posterior sonification with micro:bit
If you are not yet familiar with the SoundScapes sonification extension for Makecode micro:bit we recommend you to visit the wiki section dedicated to it.
When you collect data with the micro:bit for playing a posteriori you can save it an array. The following example collects light-level data for 10 seconds (one value per second) while mapping it to the Middle D Minor scale on 2 octaves, and plays the data after collection, each tone sequentially for 1000 ms:
The map function for arrays returns an array of integer numbers from mapping an input array to a specified music scale and number of octaves. Any array of numbers can be used as input. This is useful for a posteriori sonification when you want to sonify the data after collecting it.